Your First Workflow
This tutorial walks you through building a simple data processing workflow in layline.io. By the end, you will have a working pipeline that reads from a file, maps records into a different output structure, filters records by type, and writes them to two different output files.
Time to complete: approximately 15–20 minutes
Prerequisites: layline.io installed and running (local install or Docker). We assume a running, standard local installation for this example.
What we're building
Scenario: A system produces transaction records as CSV files. We need to:
- Read the input CSV file
- Map/Transform records into a different output structure
- Route records to different output files based on type
- Write the results to two separate files
- (Optional) append a trailer record at stream end
Step 1: Create a new Project
-
First, we recommend to create a directory for your projects on your local machine (the web ui cannot do this for you):
mkdir -p /Users/<yourname>/layline-projects -
Open the Configuration Center at
http://localhost:5841and log in withadmin/admin. -
On the right navigation, expand Create New Project.
-
Name the project
simple-filter. Optionally add a description. -
Enter the path to the directory you created plus the directory name of the project you want to create (e.g.,
/Users/<yourname>/layline-projects/simple-filter). -
Click Create.
You are now inside an empty project.
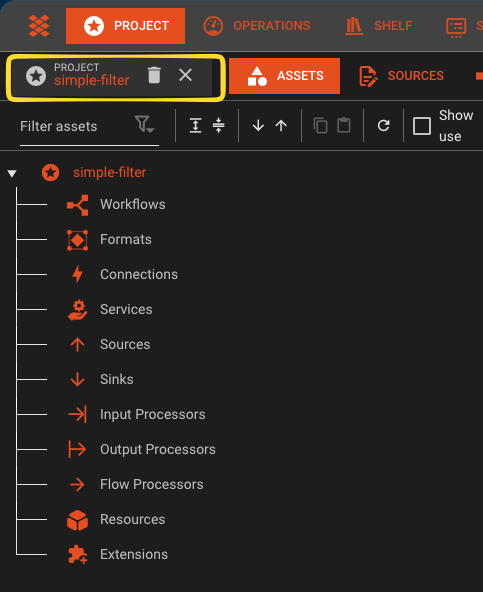
Step 2: Define the input format
First, tell layline.io what your input data looks like.
- In the left panel, navigate to the Formats leaf in the tree.
- Click on the arrow next to it, and select Add Generic Format.
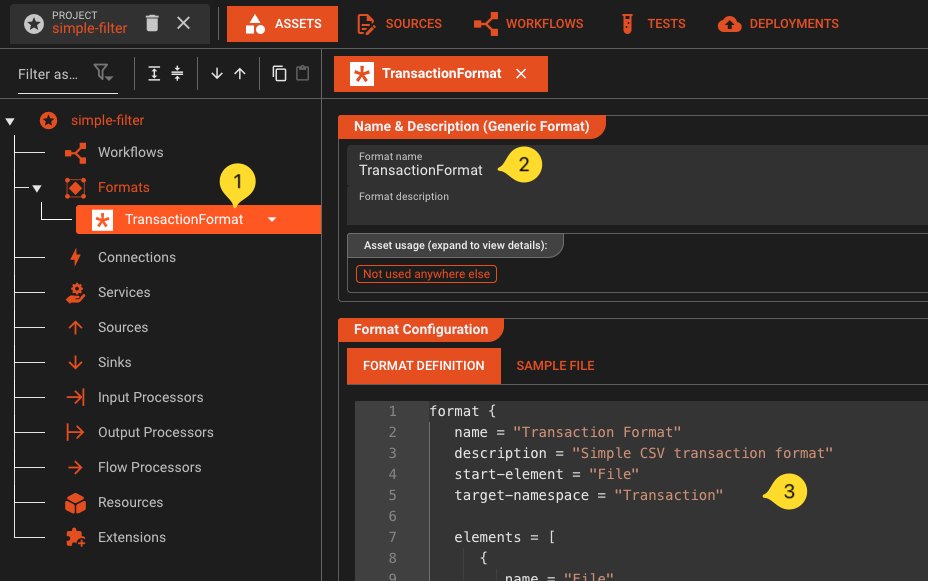
- Name it
TransactionFormat. - Enter the following grammar in the format editor. This grammar defines the structure of our CSV transaction files - you can copy-paste it as-is:
format {
   name = "Transaction Format"
   description = "Simple CSV transaction format"
   start-element = "File"
   target-namespace = "Transaction"

   elements = [
      {
         name = "File"
         type = "Sequence"
         references = [
            {
               name = "Header"
               referenced-element = "Header"
            },
            {
               name = "Details"
               max-occurs = "unlimited"
               referenced-element = "Detail"
            }
         ]
      },
      {
         name = "Header"
         type = "Separated"
         regular-expression = "HEADER"
         separator-regular-expression = ","
         separator = ","
         terminator-regular-expression = "\\r?\\n"
         terminator = "\\n"

         mapping = {
            message = "Header"
            element = "TRANS_IN"
         }

         parts = [
            {
               name = "RECORD_TYPE"
               type = "RegExpr"
               regular-expression = "[^,\\n]*"
               value.type = "Text.String"
            },
            {
               name = "VERSION"
               type = "RegExpr"
               regular-expression = "[^,\\n]*"
               value.type = "Text.String"
            }
         ]
      },
      {
         name = "Detail"
         type = "Separated"
         regular-expression = "TXN"
         separator-regular-expression = ","
         separator = ","
         terminator-regular-expression = "\\r?\\n"
         terminator = "\\n"

         mapping = {
            message = "Detail"
            element = "TRANS_IN"
         }

         parts = [
            {
               name = "RECORD_TYPE"
               type = "RegExpr"
               regular-expression = "[^,\\n]*"
               value.type = "Text.String"
            },
            {
               name = "ID"
               type = "RegExpr"
               regular-expression = "[^,\\n]*"
               value.type = "Text.String"
            },
            {
               name = "TYPE"
               type = "RegExpr"
               regular-expression = "[^,\\n]*"
               value.type = "Text.String"
            },
            {
               name = "AMOUNT"
               type = "RegExpr"
               regular-expression = "[^,\\n]*"
               value = {
                  type = "Text.Decimal"
               }
            },
            {
               name = "DESCRIPTION"
               type = "RegExpr"
               regular-expression = "[^,\\n]*"
               value.type = "Text.String"
            }
         ]
      }
   ]
}
The grammar language allows you to flexibly create a broad array of custom data formats. Note that this format defines a CSV file with one mandatory header record and an undefined number of transaction records.
- You have created your first asset.
Step 3: Define the output format
For output, use a different structure so the Mapping Processor performs an actual transformation.
- In the Formats panel, click Add Format again.
- Add another Generic Format asset.
- Name it
TransactionOutputFormat. - Enter the following grammar:
format {
   name = "Transaction Output Format"
   description = "Output CSV with transformed transaction rows and optional trailer"
   start-element = "File"
   target-namespace = "TransactionOut"

   elements = [
      {
         name = "File"
         type = "Sequence"
         references = [
            {
               name = "Transactions"
               min-occurs = 0
               max-occurs = "unlimited"
               referenced-element = "Transaction"
            },
            {
               name = "Trailer"
               min-occurs = 0
               max-occurs = 1
               referenced-element = "Trailer"
            }
         ]
      },
      {
         name = "Transaction"
         type = "Separated"
         regular-expression = "OUT"
         separator-regular-expression = ","
         separator = ","
         terminator-regular-expression = "\\r?\\n"
         terminator = "\\n"

         mapping = {
            message = "Transaction"
            element = "TransactionOut"
         }

         parts = [
            {
               name = "RECORD_TYPE"
               type = "RegExpr"
               regular-expression = "[^,\\n]*"
               value.type = "Text.String"
            },
            {
               name = "TRANSACTION_ID"
               type = "RegExpr"
               regular-expression = "[^,\\n]*"
               value.type = "Text.String"
            },
            {
               name = "TYPE_LABEL"
               type = "RegExpr"
               regular-expression = "[^,\\n]*"
               value.type = "Text.String"
            },
            {
               name = "AMOUNT"
               type = "RegExpr"
               regular-expression = "[^,\\n]*"
               value = {
                  type = "Text.Decimal"
               }
            },
            {
               name = "DESCRIPTION"
               type = "RegExpr"
               regular-expression = "[^,\\n]*"
               value.type = "Text.String"
            }
         ]
      },
      {
         name = "Trailer"
         type = "Separated"
         regular-expression = "TRL"
         separator-regular-expression = ","
         separator = ","
         terminator-regular-expression = "\\r?\\n"
         terminator = "\\n"

         mapping = {
            message = "Trailer"
            element = "TransactionOut"
         }

         parts = [
            {
               name = "RECORD_TYPE"
               type = "RegExpr"
               regular-expression = "[^,\\n]*"
               value.type = "Text.String"
            },
            {
               name = "RECORD_COUNT"
               type = "RegExpr"
               regular-expression = "[^,\\n]*"
               value = {
                  type = "Text.Integer"
               }
            },
            {
               name = "TOTAL_AMOUNT"
               type = "RegExpr"
               regular-expression = "[^,\\n]*"
               value = {
                  type = "Text.Decimal"
               }
            }
         ]
      }P
   ]
}
Note that this output format in comparison to the input format contains no header record, an unlimited number of transaction records and am optional trailer record.
- You have now created your input and output format assets.
Step 4: Configure File Source
Next we configure a File Source Asset. This describes the physical parameters to access files from folders.
-
In the Asset Tree, navigate to the Sources category, and add a new asset there.
-
Add a File System Source asset
-
Name it `Input Source`` in the details panel for this asset which has opened to the right.
-
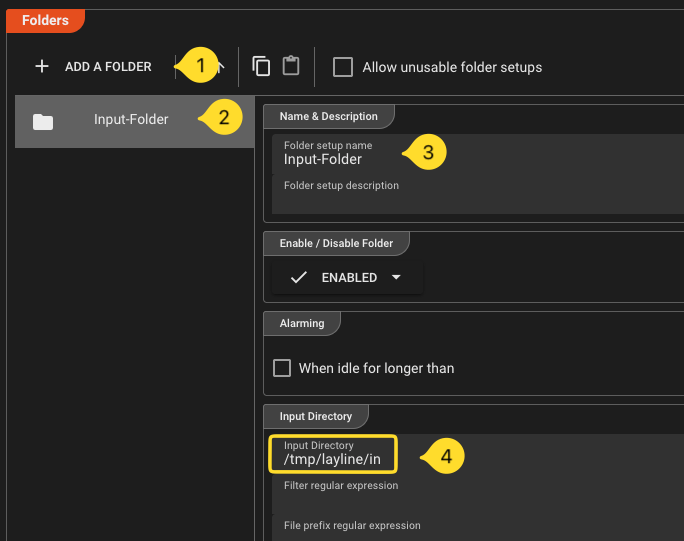
Go to the section Folders and do the following:
- Click on Add a Folder
- Name the new folder
Input-Folder. - In field Input Directory enter your input folder (e.g.
/tmp/layline/in). Create the folder you entered if it does not exist.
- Repeat this for the fields Done Directory and Error Directory with their respective directories (
/tmp/layline/doneand/tmp/layline/err). Again, if these directories do not exist, then create them.
Step 5: Configure File Sink
Likewise for the ouput files we configure TWO File Sink Asset. One for files wiht transactions of type "A" and another for files with transaction type "B"
-
Add a File System Sink asset
-
Name it `Output-Sink`` in the details panel for this asset which has opened to the right.
-
Go to the section Folders and do the following:
- Click on Add a Folder
- Name the folder
Output-Folder - In field Output Directory enter your output folder (e.g.
/tmp/layline/out/type-a). Create the folder you entered if it does not exist. - In field Temporary Directory enter a temporary output folder (e.g.
/tmp/layline/out/type-a/tmp).

-
Create another *File Sink, but this time with adjusted folders for files with transaction type "B" (
/tmp/layline/out/type-band/tmp/layline/out/type-b/tmp).
Step 6: Configure a File Input
-
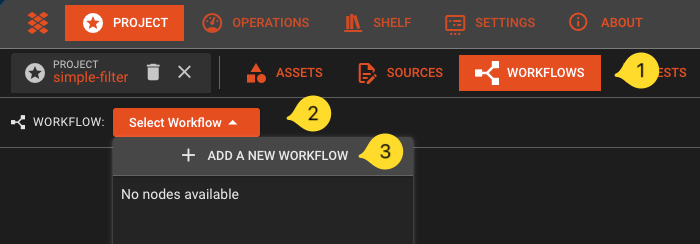
Now navigate to the Workflow tab:
-
In the toolbar, click on Select Workflow, and then select Add a new Workflow
 \
\ -
Name it
FilterTransactions. -
Click the Add Processor button and select a Stream Input processor from the list.
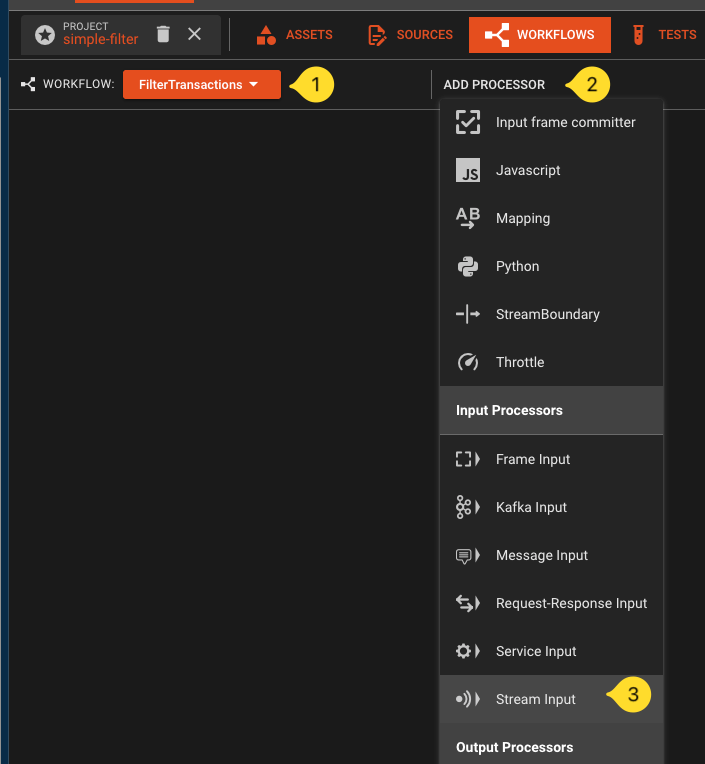 \
\ -
Name it
File-Inputand selectCreate without Asset
 \
\ -
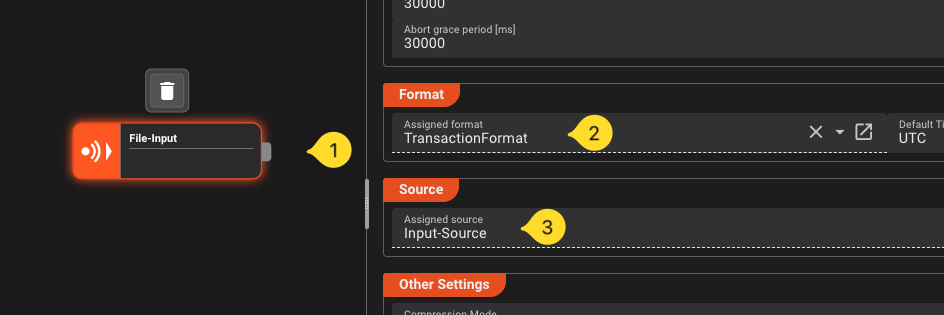
If not already selected, select the new node on the workflow canvas. The right panel whill show the properties of this processor asset. Fill in the following:
- Format -> Assigned Format: Select the
TransactionFormat. - Source -> Assigned Source: Select the
Input-Source.
- Format -> Assigned Format: Select the
Step 7: Add a Mapping Processor
-
Add a mapping processor to the Workflow.
-
Name it
MapForOutput -
Connect the output port of the File Input processor to the input port of this processor.
-
Select the mapping processor. In the details pane to the right configure the following:
- Name:
MapForOutput - Add one mapping scenario:
- Name it
HeaderRemoval - In field Source message that triggers the scenario enter
Header - This will eliminate the header in the mapping. It will then not be forwarded downstream. We do not need it in the output format.
- Name it
- Add another mapping scenario
- Name it
MapForOutput - In field Source message that triggers the scenario enter
Detail - Enable
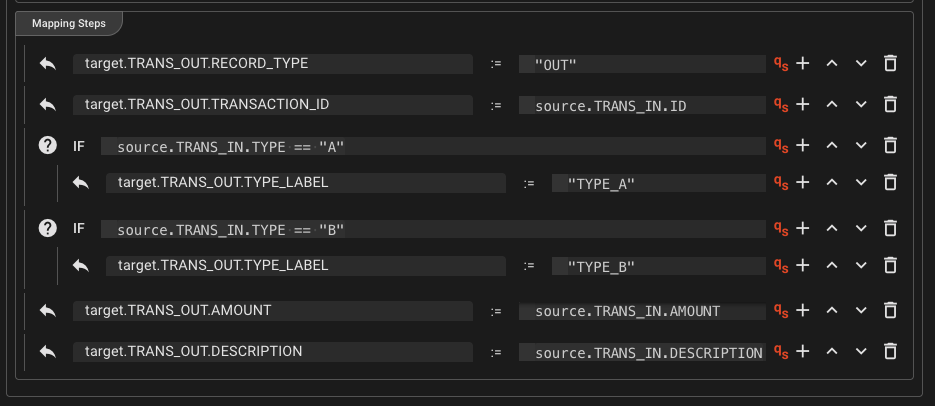
Forward original messageandUpdate original message - Add the following mapping steps (click Add Mapping or the +-sign next to a row to add a row):
target.TRANS_OUT.RECORD_TYPE:="OUT"target.TRANS_OUT.TRANSACTION_ID`` :=source.TRANS_IN.ID`- Add a new row and make it a Conditional-Element by clicking on the icon in the beginning of the row.
Entersource.TRANS_IN.TYPE == "A"- Click the plus under the conditional element and enter
target.TRANS_OUT.TYPE_LABEL:="TYPE_A"
- Click the plus under the conditional element and enter
- Add a conditional row and enter
source.TRANS_IN.TYPE == "B"- Click the plus under the conditional element and enter
target.TRANS_OUT.TYPE_LABEL:="TYPE_B"
- Click the plus under the conditional element and enter
target.TRANS_OUT.AMOUNT`` :=source.TRANS_IN.AMOUNT`target.TRANS_OUT.DESCRIPTION`` :=source.TRANS_IN.DESCRIPTIO`
- Name it
- Name:
For the MapForOutput configuration, this is what it should look like:
Step 8: Add a Router
-
Add a Router processor ot the workflow. Smply name it
Router. -
Connect the output port of
Mappingto the input port ofRouter. -
Select the
Routerand add an output port to it. The processor now has two output ports. -
Rename the first one
Output-A, and the second oneOutput-B. -
In the section Filter & Routing-Rules clidk Add at End. A new rule is created. Fill in the following details for the new rule:
- Rule Name: Name the rule
Label-A. - Conditions: Enter
message.Detail.TRANS_OUT.TYPE_LABEL == "TYPE_A" - Emit Ports: Select
Output-A
- Rule Name: Name the rule
-
Repeat the previous step and add another rule:
- Rule Name: Name the rule
Label-B. - Conditions: Enter
message.Detail.TRANS_OUT.TYPE_LABEL == "TYPE_B" - Emit Ports: Select
Output-B
- Rule Name: Name the rule
This is what the setting for route Label-A should look like:
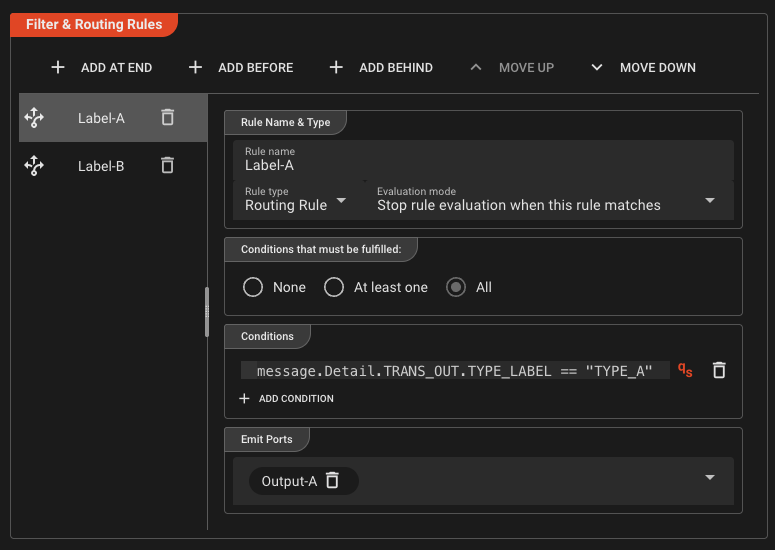
The route for Label-B is analogous.
Step 9: Configure File Output A
Create a file output processor for files with transaction type "A".
-
In the Workflow tab, add a Stream Output asset onto the canvas and connect it to Route A output.
-
If not already selected, select the new File Output node on the workflow canvas. The right panel shows the properties of this processor asset. Fill in the following:
- Format: Select
TransactionOutputFormat. - Sink: Select
Output-Sink.
- Format: Select
Step 10: Configure File Output B
Repeat Step 9 for the file with transaction type "B".
-
Create another Stream Output asset and connect it to port
Output-Bof the Router output. -
Configure:
- Format: select
TransactionOutputFormat - Sink: Select
Output-Sink.
- Format: select
Step 11 (Optional): Add trailer processors for stream-end summary rows
Perform this step if you want each output file to end with a trailer row (TRL,<count>,<sum>).
Create a script to perform the trailer calculation
We will create one script which you can use in two places.
-
Navigate to the tab Sources.
-
In the tree on the left click on the drop-down next to the main leaf and pick Add file.
-
In the upcoming dialog,
- Name:
TrailerCalc.js, - File Type:
JavaScript(default), - Template:
Empty JavaScript - confirm with `OK?
- Name:
-
A code editor for this new file will open to the right. Paste the following code into the editor:
/*** Simple script to create trailer record.* Data for trailer is recorded during processing of detail messages*/const OUTPUT_PORT = processor.getOutputPort('Output-1');let recordCount = 0; // var to count recordslet totalAmount = 0.0; // var to sum up contained amountsexport function onMessage() {stream.logInfo('--- message: ' + message); // Output to stream log --> see audit trail// Check if the message is a detail messageif (message.exists(dataDictionary.type.Detail)) {recordCount += 1; // increment countertotalAmount += message.data.TRANS_IN.AMOUNT; // sum up amount}stream.emit(message, OUTPUT_PORT); // emit to output port}export function onStreamEnd() {// Create a brand new trailer messageconst trailer = dataDictionary.createMessage(dataDictionary.type.Trailer);// Fill the trailer with datatrailer.data.TRANS_OUT = {RECORD_TYPE: 'TRL',RECORD_COUNT: recordCount,TOTAL_AMOUNT: totalAmount}stream.logInfo('--- trailer: ' + trailer); // Output to stream log --> see audit trailstream.emit(trailer, OUTPUT_PORT); // emit to output port}
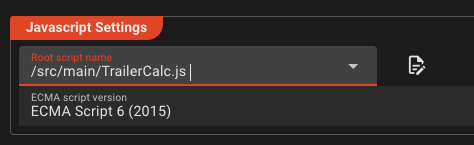
Create a Javascript Asset
- Navigate to the Asset tab
- In the asset tree on the left click on the leaf for Asset Class Flow Processors and add a JavaScript Asset.
- Name it
Trailer-Calc. - In section *Javascript Settings select the script we just created from the drop-down menu.
Add Javascript Processors to the Workflow
-
Navigate to the Workflows tab.
-
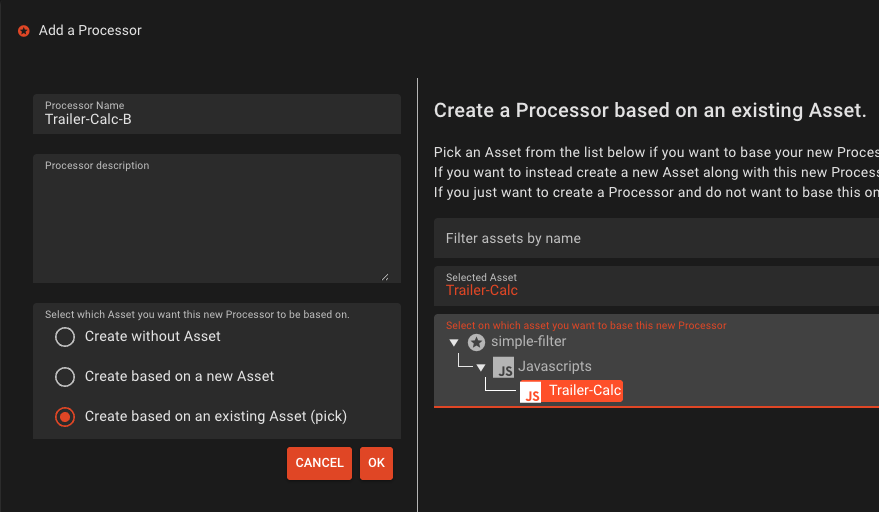
Add a Javascript Processor:
- Name it
Trailer-Calc-A - In the options list select Create based on an existing Asset
- In the tree on the right of the dialog, select the Javascript Asset we have created earlier
- Confirm with OK
- Name it
-
Connect the new Javascript Processor in between Processor
RouterandFile-Output-A.
Repeat steps 1 thru 3, but this time
- Name it
Trailer-Calc-B - Connect the new Javascript Processor in between Processor
RouterandFile-Output-B.
We have now added a two new Processors which are both based on Asset Trailer-Calc which we have defined earlier in the Asset tree. It is important to understand that we are reusing this Asset here in the workflow.
Add JavaScript Processor A between Router output Output-A and File Output A.
This is what your workflow should look like now:

Note the blue markers in the Javascript Processors which signal that this Asset and its ports are based on another Asset.
Step 12: Deploy to the Reactive Engine
You are done with the Asset and Workflow configuration. You will now create an Engine Deployment which defines what should be deployed to your Reactive Cluster.
-
In the top menu, navigate to the Deployment tab.
-
Create a new Engine Configuration
- Name it
Local-Engine. - In section Assets to Deploy click Deploy all Workflows. You only have one, so you do not have to make distinctions here.
- In secction Tag, enter
simple-filter-${build:timestamp}as the tag name.
- Name it
-
Save!
-
You have now created a Engine Configuration and ready to transfer the Deployment to the Reactive Cluster.
- In the section Deploy to Cluster pick Deploy to Cluster from the drop-down.
- In drop-down Pick Cluster to Deploy to select
Local. - Click Transfer Deployment to Cluster.
- If it asks for login, enter
admin / admin.
If all went well, then you should see this dialog:
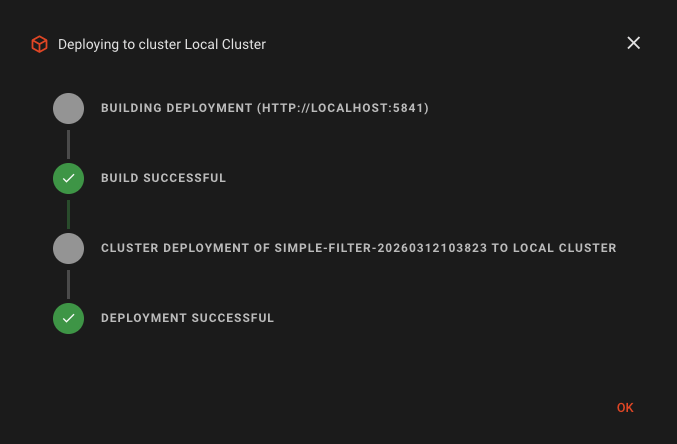
The Deployment has now been transferred to the Reactive Cluster. During this process all possible validations are performed. Should something be wrong, the Deployment will fail and you will get information about the root cause. In this case, fix the problems and retry the deplyment.
Step 13: Start the Deployment
Activate
We can now start the deployment on the Cluster:
- Navigate to the top-level Operations tab.
- Select the
Local Clusterfrom the drop-down menu, if not already selected. If you are asked for login, then enteradmin / admin. - In the Cluster tab, select **Controller ->Deployment Storage. YIf this is your first deployment, you should see this:
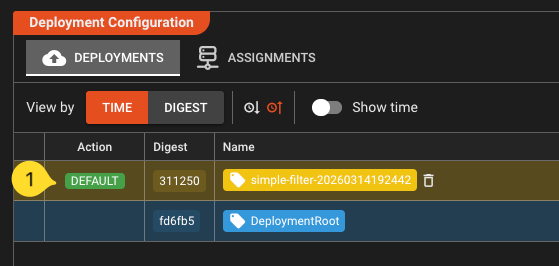
- Select the top row. A button Make Default will appear in the Action column. Click it. This will activate the deployment on the cluster.
Check State
- Now check the Engine State of the Deployment by navigating to the Engine State tab. You should see all deployed elements as green:
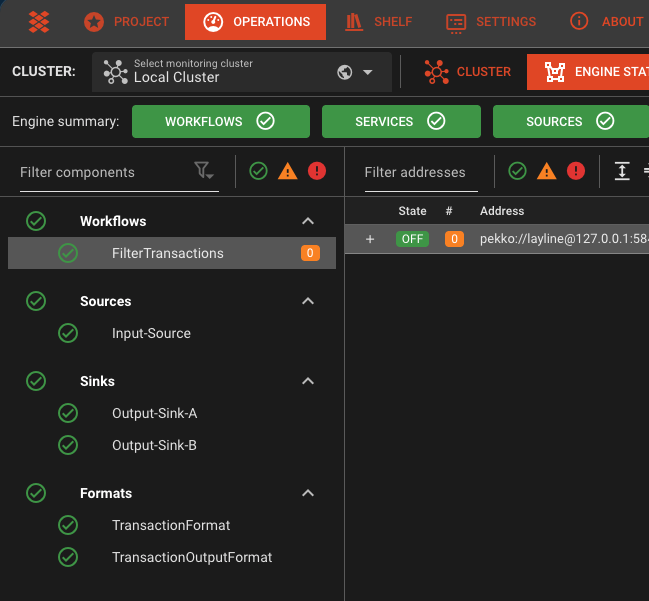
- If this is not the case, select the item marked as red, and check the problem description on the right panel. Go back and rectify it. If it is simply a wrong or missing folder, then create it. It should automatically turn green. If it is a problem in your configuration, go back to the project, fix it and do a new deployment.
Scale the Workflow
At this stage, we have no workflow instance running. Technically it would not process. As next step you will schedule the workflow, or in other words tell the Cluster how many instances of this workflow you want to run.
-
Go back to the Cluster tab
-
Select Controllers -> Scheduler Master in the tree on the left
-
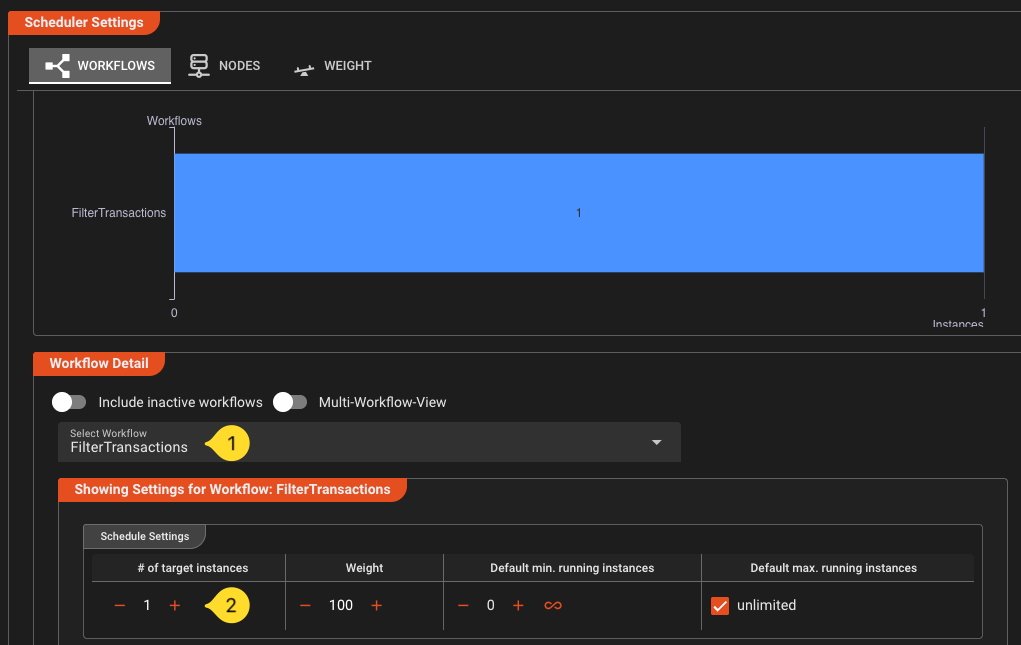
On the right panel:
- Make sure that our Workflow is selected in the drop down (1)
- Increase # of target instances to
1(2). This will tell the cluster that you want to run one instance of this Workflow.
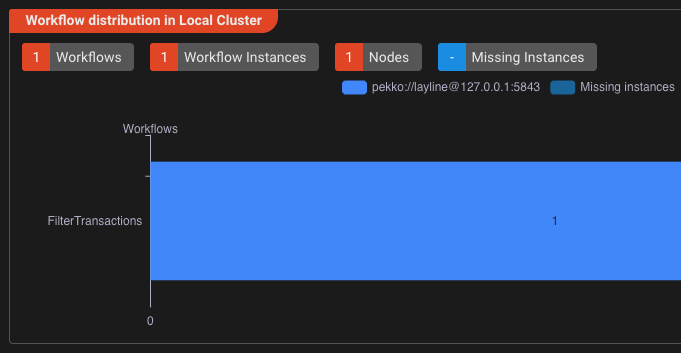
- After a few seconds you should get visual feedback that the workflow has been instantiated and is running:
Step 14: Run the workflow
-
Create the necessary directories if you haven't already done so. Adjust if you have a different folder structure:
mkdir -p /tmp/layline/in /tmp/layline/done /tmp/layline/err /tmp/layline/out/type-a /tmp/layline/out/type-a/tmp /tmp/layline/out/type-b /tmp/layline/out/type-b/tmp -
Create a sample input file
transactions.csv:HEADER,1.0TXN,TXN001,A,100.50,Payment for item 1TXN,TXN002,B,250.00,Payment for item 2TXN,TXN003,A,75.25,Payment for item 3TXN,TXN004,B,500.00,Payment for item 4TXN,TXN005,A,125.00,Payment for item 5 -
Navigate to the Operations --> Audit Trail --> Workflow Instances tab. You should see our running workflow instance:

-
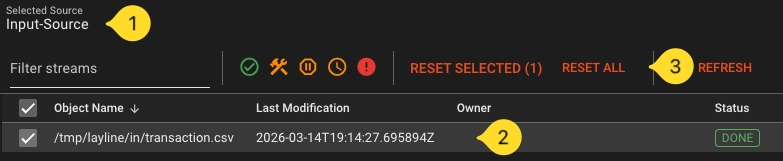
Navigate to the Streams tab. Once we process a file, it should who up here with the respective status.
-
Now drop the file you have created into
/tmp/layline/in/(or wherever you created your input folder). -
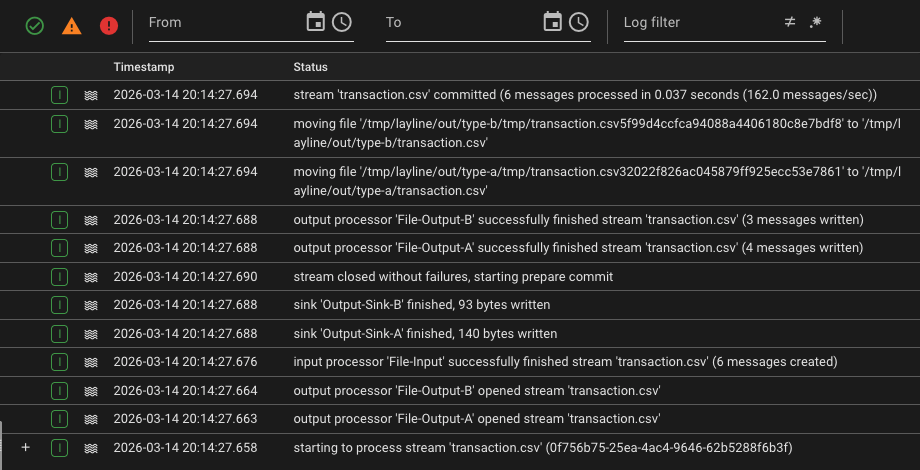
Check the Streams Audit Trail. If all went well, it should show that the file has been processed.

When you select the entry you should see the detailed logs for this on the right panel:
-
The folders
/tmp/laylineshould show this:.├── done│ └── transactions.csv├── err│ └── transactions.csv├── in└── out├── type-a│ ├── tmp│ └── transactions.csv└── type-b├── tmp└── transactions.csv/tmp/layline/out/type-a/transaction.csvshould contain transformedOUTrows for type A/tmp/layline/out/type-b/transaction.csvshould contain transformedOUTrows for type B- if you added Step 11, each file should also end with one
TRLrow - The input file should be moved to
/tmp/layline/done/
What you've learned
In this tutorial you:
- Created a layline.io project with input and output formats
- Built a workflow with File Input, Mapping Processor, Router, and File Outputs
- (Optional) Added stream-end trailer rows using JavaScript
onStreamEnd() - Deployed the workflow to a local Reactive Engine
- Ran it end-to-end and monitored the results
To run it again
layline.io by default keeps track of streams it has already processed. So if you want to run the same file again, you either have to rename it and drop it in the /tmp/layline/in folder, or you have to delete it from the Access Coordinator. To do the latter go to the Operations --> Cluster tab and select Access Coordinator from the tree. In the panel on the right pick the Sources Coordinator tab and then select the File-Input source from the list (should be the only entry if you started fresh). Select and reset the source. This will remove the file from the list of already processes artifacts.
Download ready-made project
If you have configured everything yourself, congrats to you! If you simply read to here and have not configured anything, you can download the whole project here and the transactions.csv here.
To work with the downloaded project, you need to import it:
-
Close any open project first
-
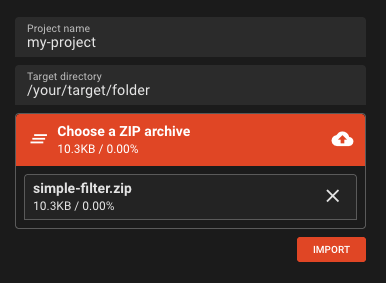
On the right side of the Project tab you will find Import from Archive. Expand it.
-
Enter the following:
- Project name:
my-project(or any other name without whitespaces). The system will also create a folder with this name and unpack the project there. - Target directory:
/your/target/folder. This is where the folder will be created - Choose a zip archive: Drag or add the downloaded zip file to this section.
- Project name:
-
Click Import. The project will be imported
-
Click Open to open the project.
You can not investigate the project yourself using the previous steps as a guideline.
Getting help
If you are interested in layline.io and need help getting started, you can always contact us at support@layline.io.
Next steps
- Concepts in depth — understand the architecture and data model in detail
- Asset Reference — explore all available source, processor, and sink types
- Mapping Processor — learn about data transformation
- Router — learn about routing logic