DynamoDB Service
Purpose
Define a service to interface with an AWS DynamoDB database.
Prerequisites
- An AWS Connection asset configured and available.
- AWS credentials (access key / secret key) or an IAM role with appropriate DynamoDB permissions.
Configuration
Name & Description
-
Name: Name of the Asset. Spaces are not allowed in the name. -
Description: Enter a description.
The Asset Usage box shows how many times this Asset is used and which parts are referencing it.
Click to expand and then click to follow, if any.
Required Roles
In case you are deploying to a Cluster which is running (a) Reactive Engine Nodes which have (b) specific Roles
configured, then you can restrict use of this Asset to those Nodes with matching roles.
If you want this restriction, then enter the names of the Required Roles here. Otherwise, leave empty to match all
Nodes (no restriction).
Dynamo DB Settings
Connection
Connection: The AWS Connection asset to use for DynamoDB access. This field supports inheritance from a parent Service definition.
Target Data Dictionary Namespace
Target data dictionary namespace: Namespace for auto-generated data types in the Data Dictionary. If left empty, the namespace defaults toService{Name}Types(e.g., a service namedCustomerDatawould default toServiceCustomerDataTypes). This field supports inheritance from a parent Service definition.

Functions
Functions give granular control over DynamoDB operations. Unlike Collections, you define each function type explicitly. See Auto-Generated Function Names for how these functions are named and invoked.
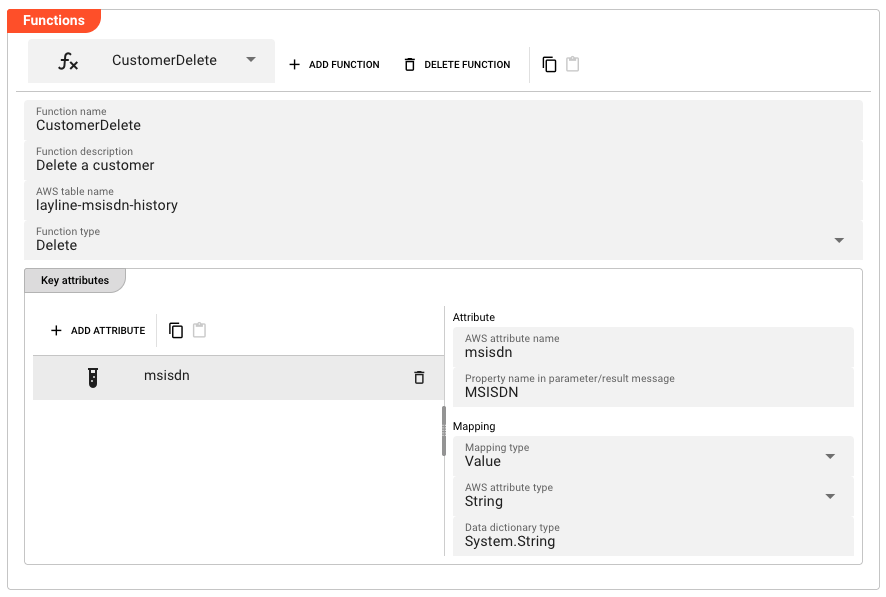
Add a Function
Click Add Function to create a new Function.
Function Name & Description
-
Function name: Name of the Function. Must be unique within the Service. Must not contain spaces. -
Function description: Optional description of the Function.
AWS Table Name
AWS table name: The name of the DynamoDB table. Can be overridden per function if different from the Service-level table name.
Function Type
Function type: The type of DynamoDB operation. Options:
| Value | Description |
|---|---|
| Delete | Delete an item from the table |
| Read | Read an item from the table |
| Write | Write an item to the table |
Key Attributes
Key attributes define the primary key of the DynamoDB table, just as in Collections. See Attribute Mapping for details on how to configure the mapping.
Value Attributes
Value attributes are available for Read and Write function types only. See Attribute Mapping for details on how to configure the mapping.
Delete / Copy / Paste / Reset to parent
- Delete Function : Removes the selected Function. A confirmation dialog appears.
- Copy : Copies the Function to the clipboard.
- Paste : Pastes a Function from the clipboard (if one has been copied).
- Reset to parent : Resets the Function to the inherited value from a parent Service (if any).
Collections
Collections provide a convenient way to define DynamoDB table access. A Collection defines a table schema and automatically generates Read, Write, and Delete functions for that table. See Auto-Generated Function Names for how these functions are named and invoked.
Use Collections when you want a general-purpose way to access a table. Use Functions when you need granular control over individual operations.
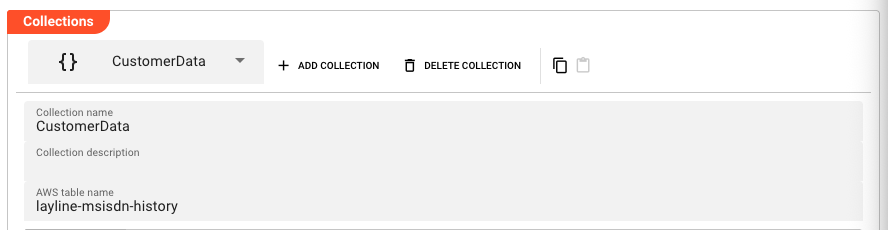
Add a Collection
Click Add Collection to create a new Collection.
Collection Name & Description
-
Collection name: Name of the Collection. Must be unique within the Service. Must not contain spaces. -
Collection description: Optional description of the Collection.
AWS Table Name
AWS table name: The name of the DynamoDB table as defined in AWS.
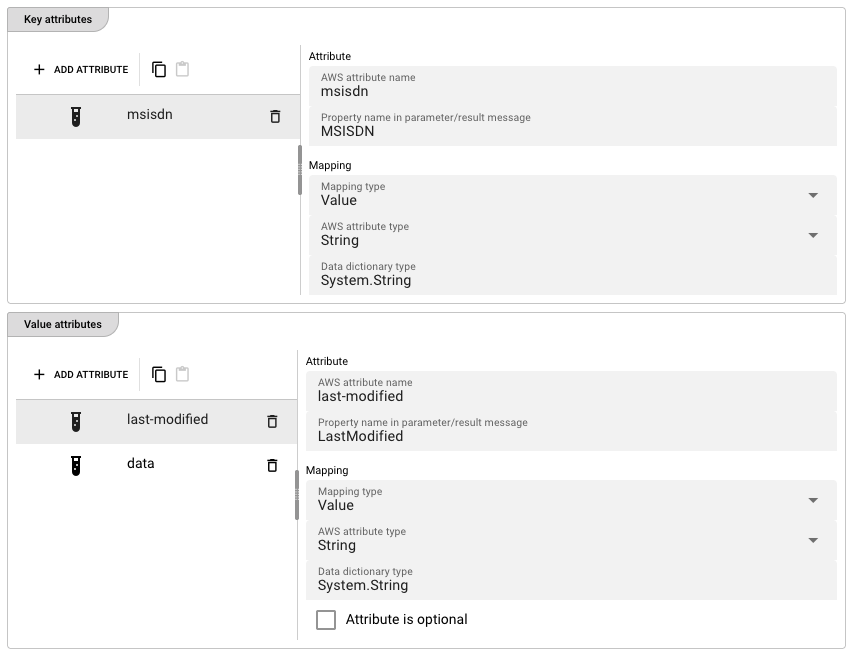
Key Attributes
Key attributes define the primary key of the DynamoDB table. You must define at least one key attribute.
Each key attribute maps a DynamoDB primary key component to a message property.
-
AWS attribute name: The name of the attribute in DynamoDB. -
Property name in parameter/result message: The name of the corresponding field in the layline.io message.
For each key attribute, configure the Mapping as described below.
Value Attributes
Value attributes define the non-key attributes of the DynamoDB item. These are optional depending on your access pattern.
Each value attribute has the same fields as key attributes, plus additional mapping options. See Attribute Mapping for details on how to configure the mapping.
Delete / Copy / Paste / Reset to parent
- Delete Collection : Removes the selected Collection. A confirmation dialog appears.
- Copy : Copies the Collection to the clipboard.
- Paste : Pastes a Collection from the clipboard (if one has been copied).
- Reset to parent : Resets the Collection to the inherited value from a parent Service (if any).
Attribute Mapping
Each attribute (key or value) has a configurable mapping that defines how the attribute is stored in DynamoDB and how it maps to the layline.io message.
Mapping Type
Mapping type: How the attribute value is resolved. Options:
| Value | Description |
|---|---|
| Data Dictionary | Maps to a data dictionary type (complex types) |
| Value | Uses a static value type (string, binary) |
| TTL | Maps to a DynamoDB TTL (time-to-live) attribute |
Available Options per Mapping Type
The following table shows which options are available for each Mapping type, and describes what each option does. All mapping types also include the base Attribute fields (AWS attribute name, Property name in parameter/result message) which are described above.
| Option | Data Dictionary | Value | TTL | Description |
|---|---|---|---|---|
AWS attribute type | Yes | Yes | — | The DynamoDB attribute type. Options: Binary, String. |
Data dictionary type | Yes | Yes | — | Select a layline.io data dictionary type instead of (or in addition to) an AWS attribute type. |
Serialization type | Yes | — | — | How complex types are serialized. Currently only Json is supported. |
Attribute is optional | Yes | Yes | — | Checkbox (value attributes only). Marks the attribute as optional in the DynamoDB item. |
Use AWS null attribute | Yes | Yes | — | Checkbox (value attributes only). When enabled alongside Attribute is optional, stores null values as a DynamoDB null type instead of omitting the attribute. |
Default TTL | — | — | Yes | Default time-to-live value in seconds. The DynamoDB item will be automatically deleted by AWS after this many seconds from the TTL attribute value. |
Note: Use AWS null attribute for Value mapping is only available when Attribute is optional is checked.
Data Dictionary
The Data Dictionary allows you to define complex data structures which can be mapped onto external data types and vice versa. This is necessary whenever an asset needs to exchange structured data with an external system — for example, when reading from or writing to a database, an HTTP API, a message queue, or any other format that carries typed fields.
Rather than hard-coding external field names and types into your Workflow, you define your own internal data types here. These internal types are then mapped to the external system's fields at the asset level. This means your Workflow scripts work with consistent, self-documenting data structures regardless of which external system the data came from.
When you need it
Whenever you configure an asset that exchanges structured data — a JDBC Service, a DynamoDB Service, an HTTP endpoint, an MQ message, a database Resource — you use the Data Dictionary to declare the types that represent:
- Request parameters — the data your Workflow sends to the external system
- Result data — the data the external system returns to your Workflow
- Intermediate structures — types that hold data during a transformation
Entity Types
The Data Dictionary is organized as a tree of typed entities. The available entity types are:
| Entity | Description |
|---|---|
| Namespace | Groups related types. Optional. If you reuse a namespace name that already exists in the Project, the two namespaces merge. |
| Sequence | An ordered list of typed members. Members are accessed by name, e.g. MyNamespace.Customer.Name. |
| Enumeration | A fixed set of named integer constants. |
| Choice | A type that holds exactly one of several possible member types. |
| Array | A sequence of elements of a single contained type. |
Defining Types — Step by Step
The following walkthrough shows how to build a data structure using the Data Dictionary editor. The example assumes a SQL customer table with columns id, name, and address — but the same pattern applies whenever you need to declare types for any asset.
1. Declare a new type
Click Declare Root Type in the toolbar to add a top-level entity.

2. Declare a namespace (optional)
Namespaces organize related types. To add one, right-click an existing node and select Add Sibling, then set the element type to Namespace.

-
Name— The name of the namespace. If a namespace with this name already exists elsewhere in the Project, their contents merge automatically. Otherwise the name must be unique and may not contain spaces. -
Type— Pick the entity type. For a namespace, selectNamespace. -
Description— Optional free-text description.
3. Declare a Sequence under the namespace
Right-click the namespace and choose Add Child to add a child element.

Click the arrow next to the namespace name and select Add child. Then fill in the element details:

-
Name— The name of the element, e.g.Customer. -
Type— SelectSequenceas the element type. You will add individual fields (members) in the next step. -
Extendable Sequence— When checked, layline.io can dynamically extend the sequence's member list if incoming data contains fields that are not explicitly defined. Leave unchecked if all fields are known in advance.
4. Add members to the Sequence
With the Sequence selected, click Add Child to add individual fields:

Each member maps to a column in the external data source. You can reference any member by its full path — for example, MyNamespace.Customer.Name — from your Workflow scripts.
Common Entity Fields
These fields are available on all entity types:
| Field | Description |
|---|---|
| Name | Unique identifier within the namespace. Reusing a namespace name from another part of the Project merges the two. |
| Type | The entity kind: Namespace, Sequence, Enumeration, Choice, or Array |
| Description | Optional free-text description |
| Extendable Sequence | (Sequence only) Allows the member list to be extended dynamically at runtime |
| Members | (Sequence) Ordered list of typed fields — click Add Child to add each one |
| Elements | (Enumeration) Named integer constants making up the enumeration |
Advanced Features
Inheritance and Override
Entities inherited from a parent format or resource appear in the tree in a distinct inherited style. These are read-only unless overridden. Click Reset to Parent on an overridden entity to restore the inherited definition.
Copy and Paste
Use the toolbar buttons to copy a complete entity subtree and paste it elsewhere in the tree. All members and nested entities travel with it.
Filter and Sort
Use the Filter field to search entities by name. The sort buttons order nodes ascending or descending alphabetically.
See Also
- Data Dictionary Format Asset — standalone Data Dictionary asset
- DynamoDB Service — Data Dictionary in context of a DynamoDB Service
- JDBC Service — worked example mapping Data Dictionary types to SQL columns
Auto-Generated Function Names
DynamoDB Service auto-generates Function names that are used to invoke the service from Workflows and JavaScript processors:
From Collections:
| Operation | Function Name Pattern |
|---|---|
| Delete | {Namespace}.Delete{CollectionName} |
| Read | {Namespace}.Read{CollectionName} |
| Write | {Namespace}.Write{CollectionName} |
From Functions:
| Operation | Function Name Pattern |
|---|---|
| Delete | {Namespace}.{FunctionName} |
| Read | {Namespace}.Read{FunctionName} |
| Write | {Namespace}.Write{FunctionName} |
Parameter and result types follow the pattern {Namespace}.{Operation}{Name}.Parameter and
{Namespace}.{Operation}{Name}.Result respectively.
Example
Given a DynamoDB Service named CustomerDataDynamoDBService with the default namespace (ServiceCustomerDataTypes),
and a Read function named ReadCustomerData:
| Item | Example Value |
|---|---|
| Function name | ServiceCustomerDataTypes.ReadReadCustomerData |
| Parameter type | ServiceCustomerDataTypes.ReadReadCustomerData.Parameter |
| Result type | ServiceCustomerDataTypes.ReadReadCustomerData.Result |
Using a DynamoDB Service from a Script Processor
To use a DynamoDB Service in a JavaScript or Python processor:
-
Add the DynamoDB Service asset to your project and configure Collections or Functions with the desired table operations.
-
Reference the Service from your processor by accessing it via the
servicesglobal:
- JavaScript
- Python
const dynamoDBService = services.<ServiceName>;
dynamo_db_service = services.<ServiceName>
- Call service functions using the auto-generated function names:
- JavaScript
- Python
let result = dynamoDBService.<Operation><FunctionName>({ /* parameters */ });
result = dynamo_db_service.<Operation><FunctionName>({ /* parameters */ })
- Handle the response using the auto-generated result types in the Data Dictionary.
For more information, see JavaScript Processor or Python Processor.
Example: Write
- JavaScript
- Python
/**
 * Write the customer data to Dynamo DB
 * @param msisdn MSISDN to write
 * @param msisdnData Data of the MSISDN
 */
function writeMsisdnData(msisdn, msisdnData) {
    services.CustomerDataDynamoDBService.WriteCustomerData({
        MSISDN: msisdn,
        LastModified: DateTime.now().toString(),
        Data: msisdnData.data
    });

    if (!messageMsisdnDataValid(msisdnData)) {
        reportDataFailure(
            'Resulting MsisdnData is invalid (no Brand)',
            msisdnData
        );
    }
}
from datetime import datetime

def write_msisdn_data(msisdn, msisdn_data):
    """Write the customer data to Dynamo DB.
    @param msisdn: MSISDN to write
    @param msisdn_data: Data of the MSISDN
    """
    services.CustomerDataDynamoDBService.WriteCustomerData({
        'MSISDN': msisdn,
        'LastModified': str(datetime.now()),
        'Data': msisdn_data.data
    })

    if not message_msisdn_data_valid(msisdn_data):
        report_data_failure(
            'Resulting MsisdnData is invalid (no Brand)',
            msisdn_data
        )
In this example:
services.CustomerDataDynamoDBServicereferences the DynamoDB Service assetWriteCustomerDatais the auto-generated Write function name for a Collection or Function- The parameter object includes the key attribute (
MSISDN) and value attributes (LastModified,Data) - The response is handled via validation against the local data dictionary type
Service Testing
layline.io provides a test facility for testing your Services before you deploy them. In this way, you save time and effort by testing your Services without having to deploy and activate a whole Project with Workflows.
Once you have configured your Service(s), you can test them:
Within your Asset Configuration tab (1), switch to the Test tab (2) to test your Service.

Test Facility Toolbar
The toolbar provides the following options:

The Testing tab provides two major views:
- Testcase configuration: This is where you define the testcases to be executed.
- Testcase execution: This is where you can execute the testcases and see the results.
You switch between these two views by clicking on the leftmost icon in the toolbar (1).
Let's start with the Testcase configuration view.
Testcase Configuration
The concept of the Testing is to define a set of Testcases which can be executed in a batch or individually. For this purpose, you can define multiple Testcases and configure them individually. I.e. each Testcase groups a number of indidivual tests which can be executed individually or in a batch.
Adding a Testcase
Click Add Testcase in the toolbar to add a new testcase:

A new Testcase is added.
It is automatically named New<Service Asset Name>Test (3) and added to the list of Testcases (2).
Service test name(3): You can change the name of the Testcase here.Service test description(4): You can add a description to the Testcase here.
Test Case Setup
Basics
In this section you define the individual tests to be executed for this Testcase.
To start, click # END in the toolbar:

A new test is added to the list of tests (1), and the test is opened for configuration (2).

Next we fill in the details:
-
Test name(3): You can change the name of the Test here. -
Test description(4): You can add a description to the Test here. -
Service function to test(5): Select the Service function to test here.This list contains all Service functions which are defined in the Service Asset. Pick the one you want to test.

Once a Service function is selected, the system will automatically create a skeleton to fill in the respective parameters for the selected Service function.

Service Function Input Parameters
-
Service Function Input Parameters(6): Fill in the respective parameters for the selected Service function.In our example we have a function
GetAlertsForSitewhich takes two parametersbaseurlandriskId. If we click onAdd memberin the skeleton table the system will allow you to select the respective parameter from the list of available parameters:
Once you have selected the parameter, the system will automatically add the respective parameter name. You then add the respective value for the parameter:

Service Function Evaluation Parameters
To automatically evaluate the result, you can add a script which analyzes the results.
Testcase Execution
Once you have configured your Testcases, you can execute them.
There are two ways on how to trigger execution:
-
Option 1: Select
Run selected testin the toolbar (1) to execute the currently selected Testcase.
Executing a test this way will switch the tab to the Testcase execution view, execute the test and show the results.
-
Option 2: Switch to the Testcase execution view by clicking on the leftmost icon in the toolbar (1) select the test to execute, and then hit the
playbutton next to the test.
Each option will take us to the Testcase execution view:

In this view you can find the Testcase (1) and the Tests (2) we have created.
If we had created additional tests for this Testcase, they would be listed here as well.
Question marks indicate that the test has not yet been executed.
We can now either execute all tests, or run them individually:
-
Run all Tests(1): Click this button to execute all tests. -
Run Testcase(2): Click this button to a Testcase with all its underlying individual tests.
-
Run individual Test(3): Click this button next to a test to execute this individual test.
Once a test has been executed, the question mark will be replaced by a green check mark or a red cross depending on whether the test was successful or not.
The right hand-panel will show the results of the test execution respectively:

In case of errors, the system will show the error message for further investigation.
Please note, that the creation of the online documentation is Work-In-Progress. It is constantly being updated. should you have questions or suggestions, please don't hesitate to contact us at support@layline.io .